

Table of Contents
- Why Custom Fabric Goods From Old Jerseys Make Sense
- Understanding Jersey Knit and Fabric Weight for Your Project
- The Custom Fabric Printing Process for Jersey Goods
- DIY Jersey Memory Quilt: Step-by-Step Instructions
- Stabilizing Jersey Knit for Crafts: Essential Techniques
- Applications for Custom Jersey Fabric Goods
- Upcycling vs. Buying New: Cost-Benefit Analysis
- Turnaround Times and Getting Started
Last Updated: August 8, 2026
Why Custom Fabric Goods From Old Jerseys Make Sense
You've got a closet full of jerseys that mean something. A signed rookie season piece. Your dad's favorite team colors from the '90s. That championship jersey your kid outgrew. Most end up in a donation bin or storage box that never gets opened again.
Custom fabric goods from old jerseys solve that problem. Instead of letting memorabilia sit unused, you transform it into something functional and beautiful. A memory quilt becomes a conversation starter on your couch. A luggage tag turns every trip into a statement about what you care about. A doormat or blanket keeps your favorite moments visible and touchable every single day.
MoonlightWeave specializes in exactly this, taking vintage jerseys and transforming them into handcrafted fabric goods that celebrate your sports memories. Jersey knit fabric has specific properties that make it ideal for certain projects, it's stretchy, durable, and holds color well. Understanding how to work with these materials and knowing which applications make sense is what separates a beautiful custom piece from something that falls apart after a season.
Understanding Jersey Knit and Fabric Weight for Your Project
Jersey knit is a knitted fabric constructed from interlocking loops of yarn, creating natural stretch in both directions. This is why it feels soft against skin and moves with you. Cotton jersey is the most common base, though blends with Lycra or polyester are increasingly popular for performance applications.
When planning custom fabric goods from old jerseys, weight matters tremendously. Heavier jersey holds its shape better and resists pilling. Lighter jersey feels softer but can become thin with repeated washing and wear.
Cotton Jersey vs. Lycra Blends
Pure cotton jersey offers breathability and comfort, ideal for keepsake quilts, blankets, and home decor. It absorbs moisture and feels natural against skin, which is why it's still the standard for memory projects.
Lycra blends add elasticity and recovery, making them better for activewear, swimwear, and functional items that need to withstand regular use. A 15-20% Lycra content gives meaningful stretch without sacrificing breathability. For custom fabric goods from old jerseys destined for home decor or quilts, pure cotton jersey is usually the right choice. For luggage tags, functional apparel, or items that see frequent handling, a Lycra blend provides better durability and shape retention.
GSM and Durability Specifications
GSM (grams per square meter) measures fabric weight and density. Jersey knit typically ranges from 150-300 GSM. Lightweight jersey (150-180 GSM) drapes beautifully but is prone to thinning over time. Medium weight (200-240 GSM) balances comfort with durability and is most versatile for custom projects. Heavy weight (260-300+ GSM) resists pilling and holds structure.
For memory quilts and keepsake projects, 200-240 GSM provides the sweet spot. For functional items like doormats or luggage tags that experience regular wear, 250+ GSM ensures longevity.
The Custom Fabric Printing Process for Jersey Goods
Transforming your old jerseys into new custom fabric goods requires specific printing and fabrication techniques. When MoonlightWeave works with your memorabilia, the team assesses condition and material composition first. The printing method depends on what you're creating and your source material's condition.
Sublimation Printing Technology
Sublimation printing is a method for creating vibrant, durable custom fabric goods from old jerseys. This digital printing technique converts solid dyes into gas, which bonds directly into fabric fibers. The result is a print that won't fade, crack, or peel, even after hundreds of washes.
Sublimation works best on polyester or polyester-blend fabrics. If starting with pure cotton jerseys, the fabric needs pre-treatment with a special coating. The process involves designing your layout, printing onto special transfer paper using sublimation inks, pressing the transfer onto fabric with heat and pressure, and allowing dyes to penetrate the fiber structure permanently. You can reproduce detailed designs, photographs, or multi-color layouts without degradation.
Digital Printing on Stretch Fabrics
Digital printing applies ink directly to fabric using inkjet technology. This method works on cotton and cotton blends without pre-treatment, making it faster for small-batch custom orders.
Digital printing on stretch fabrics requires careful technique. Jersey knit's elasticity means fabric can shift during printing, causing misalignment. Professional printers use specialized platens and tension systems to keep fabric stable. The ink sits on the surface rather than bonding into fibers, so it's slightly less durable than sublimation but still holds up well with proper care.
DIY Jersey Memory Quilt: Step-by-Step Instructions
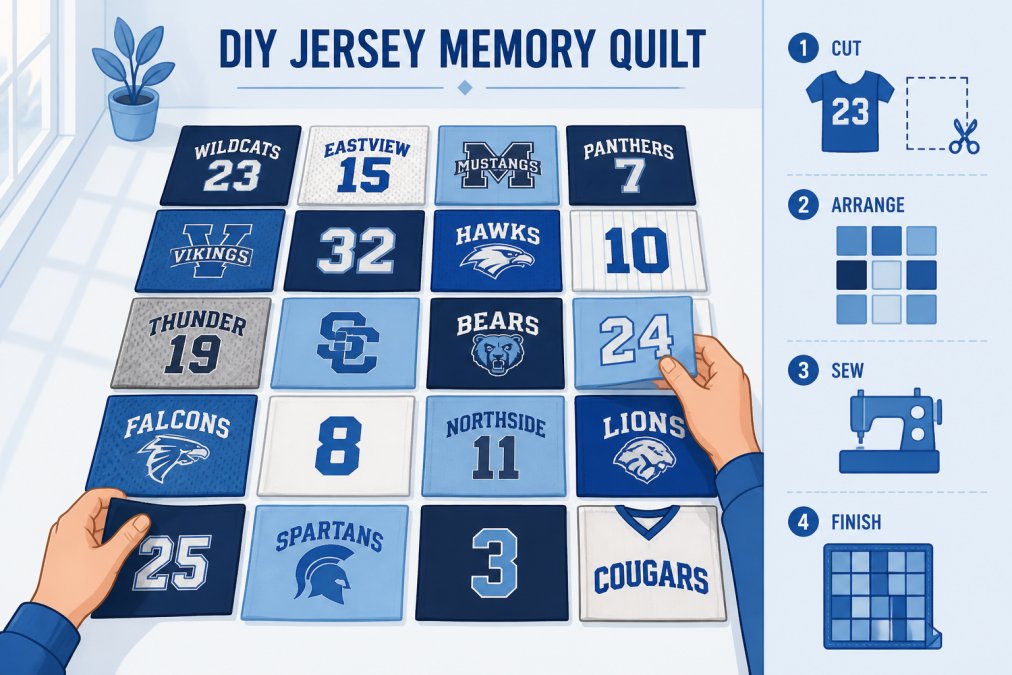
A memory quilt transforms a collection of jerseys into a functional, emotional centerpiece. This is one of the most popular applications for custom fabric goods from old jerseys.
Preparing Your Jerseys
Start by selecting which jerseys will make the cut. Focus on pieces with strong visual impact or emotional significance. Wash and dry each jersey before cutting using cold water and gentle detergent to minimize bleeding. Assess the condition of each piece and note stains or thin spots you can work around.
Cutting and Arranging Blocks
Jersey knit is forgiving to cut but challenging to arrange perfectly. The fabric stretches, which means your blocks won't be perfectly square, and that's fine. Aim for consistency rather than perfection.
Cut your jerseys into uniform blocks. Standard sizes are 6x6 inches, 8x8 inches, or 10x10 inches. Larger blocks show off logos better. Use a rotary cutter and quilting ruler for straight lines. Once cut, arrange blocks on a large, clean surface. Group by color, alternate light and dark, or create a specific pattern. Take a photo of your arrangement before sewing.
Assembling and Finishing Your Quilt
Jersey knit requires stabilizing before sewing. Once stabilized, sew your blocks together in rows using a quarter-inch seam allowance. Use a ballpoint needle on your sewing machine, which slides between fibers rather than piercing them, preventing runs and laddering.
After all rows are sewn, press each seam to one side, then sew rows together to complete the quilt top. Layer your quilt top, batting, and backing, then quilt them together using straight lines or a simple pattern. Finish the edges with binding or a simple fold-and-stitch method. The entire process typically takes 20-40 hours depending on quilt size and your sewing experience.
Stabilizing Jersey Knit for Crafts: Essential Techniques
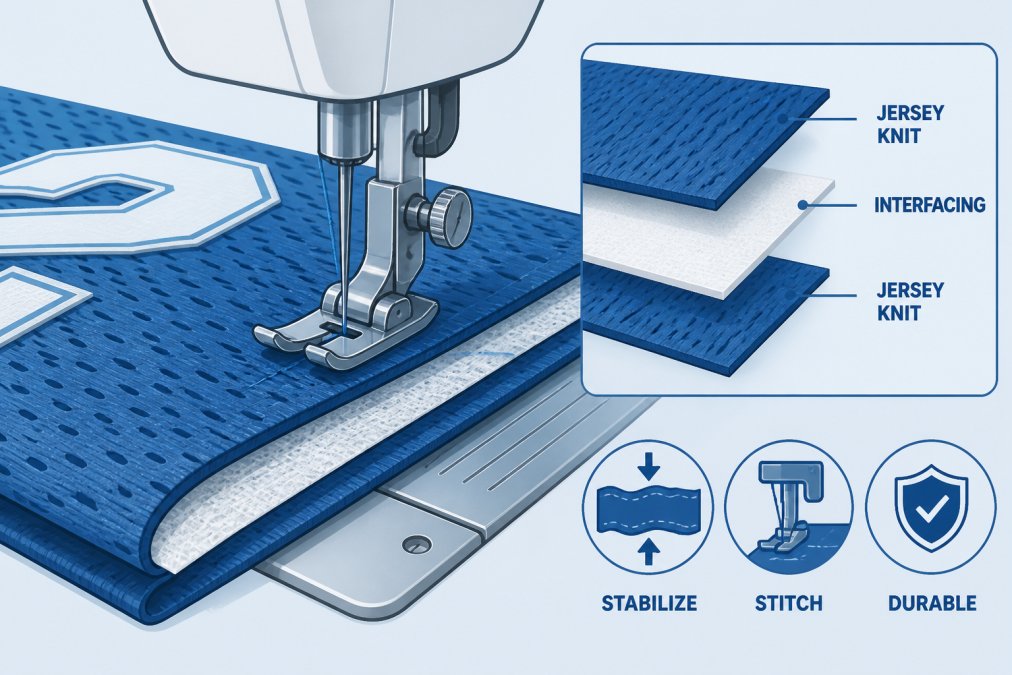
Jersey knit's stretch and recovery make it difficult to work with without proper stabilization. Your fabric needs support before you cut, print, or sew it.
Interfacing and Backing Methods
Interfacing is a thin, stabilizing fabric fused to the back of your jersey knit. It prevents stretching during cutting and sewing while remaining flexible enough that your finished piece doesn't feel stiff.
Choose a weight that matches your jersey. Lightweight interfacing (1.5-2.5 ounces per square yard) works for delicate projects. Medium weight (2.5-3.5 ounces) is ideal for luggage tags and doormats. Heavy weight (3.5+ ounces) provides maximum stability but can feel cardboard-like.
Apply interfacing by cutting a piece the same size as your jersey block, placing the interfacing adhesive-side down on the wrong side, and using a medium heat iron with steam to fuse for 10-15 seconds. Allow it to cool completely before handling. For projects needing more structure, use a double-layer approach: interfacing on the back plus quilting cotton backing sewn on top.
Sewing Techniques for Stretch Fabrics
Once stabilized, jersey knit still requires specific sewing techniques to prevent runs, laddering, and seam separation.
Use a ballpoint needle (size 70/10 or 80/12) instead of a standard sharp needle. Set your machine to a narrow zigzag stitch (width 0.5-1.0, length 2.0-2.5) instead of a straight stitch. The zigzag allows the seam to stretch slightly with the fabric, preventing seam breakage. Use polyester thread instead of cotton, as polyester has more give and won't snap under tension. Maintain consistent tension and presser foot pressure, and stretch the fabric slightly as you feed it through the machine.
Applications for Custom Fabric Goods From Old Jerseys
The versatility of jersey knit opens up dozens of possibilities beyond memory quilts.
Home Decor and Keepsake Projects
Memory quilts remain the most popular application. A quilt made from your collection becomes a focal point in your home, draped over a couch, displayed on a bed, or hung as wall art. Beyond quilts, jersey fabric works beautifully for throw pillows, wall hangings, decorative blankets, and doormats. A custom doormat made from your favorite team's jersey creates an immediate statement about what you value.
These home decor applications work best with medium to heavy weight jersey (220+ GSM) because they see regular handling and need to maintain their appearance over years of use.
Activewear and Functional Items
Jersey knit's moisture-wicking properties and stretch make it suitable for functional activewear and accessories. Luggage tags, gym bags, and athletic wear made from your favorite team's jersey combine nostalgia with practicality. A luggage tag made from stabilized jersey knit with a printed nameplate is durable enough for years of travel. For activewear, Lycra-blend jersey works better than pure cotton because the added elasticity helps the garment recover its shape after stretching during activity.
Upcycling vs. Buying New: Cost-Benefit Analysis
The decision to transform old jerseys into custom fabric goods versus buying ready-made sports decor depends on several factors beyond just price.
Upcycling your own memorabilia creates something that can't be replicated. A memory quilt made from your specific collection is unique. The time investment is significant, a DIY memory quilt takes 20-40 hours of work. However, if you enjoy the process and view it as a creative project rather than a chore, that calculation changes. Material costs are modest, with interfacing, batting, backing fabric, and thread for a full-size quilt costing less than $50.
Professional custom fabrication through services like MoonlightWeave handles the technical challenges and delivers polished results. You send in your memorabilia, specify what you want created, and receive a finished piece. This eliminates the learning curve and time commitment while ensuring professional-quality construction. The trade-off is paying for labor and expertise.
The best choice depends on your priorities. If you want a finished piece quickly and don't mind generic design, buy new. If you have specific memorabilia you want to preserve and enjoy hands-on projects, DIY upcycling makes sense. If you want professional results without the time investment, professional custom fabrication bridges the gap.
Turnaround Times and Getting Started
Understanding realistic timelines helps you plan whether a DIY project, professional custom order, or ready-made purchase fits your needs.
DIY projects depend entirely on your schedule and experience. A simple pillowcase takes 4-6 hours. A full-size memory quilt takes 20-40 hours spread over several weeks. Factor in learning time for techniques you've never tried before.
Professional custom fabrication typically takes time from order to delivery. This includes initial consultation, design approval, production, and shipping. Ready-made items ship within days, making them the only option for last-minute needs.
When you're ready to get started with custom fabric goods from old jerseys, gather your materials and assess what you want to create. If tackling a DIY project, invest in quality tools: a rotary cutter, self-healing mat, and quilting ruler make the process faster and more accurate. If working with a professional fabricator like MoonlightWeave, prepare your memorabilia carefully. Clean jerseys, document any damage or stains, and communicate clearly about what you want the finished piece to look like.
The difference between letting your jerseys sit in a box and transforming them into something you use and enjoy every day is surprisingly simple. Whether you choose to DIY a memory quilt, commission a professional custom piece, or explore other applications, the goal is the same: honoring what those jerseys mean to you by giving them a second life.
At MoonlightWeave, we understand the emotional weight of sports memorabilia. Our handcrafted approach to transforming vintage jerseys into functional, beautiful fabric goods, from cozy blankets to custom luggage tags, ensures your collection becomes something you'll actually use and treasure. Each piece is designed to celebrate your specific memories while standing up to real-world use. Get started with MoonlightWeave and turn your favorite jerseys into keepsake pieces that tell your story.
Frequently Asked Questions
What can I make out of old sports jerseys?
Old jerseys transform into dozens of items: memory quilts, throw blankets, pillows, doormats, luggage tags, wall art, and even activewear. Jersey knit's stretchable nature and moisture-wicking properties make it ideal for both decorative pieces and functional goods. The fabric's durability means your finished project will last for years. Popular choices combine nostalgia with everyday use, a hockey jersey becomes a cozy blanket, a football jersey becomes a keepsake quilt. Your options depend on how much jersey fabric you have and what textile printing or sewing techniques you want to use.
How do you stabilize jersey knit for crafts?
Jersey knit needs stabilization because it stretches and curls. Use fusible interfacing on the wrong side of the fabric before cutting or sewing, this prevents distortion and gives structure. For quilting projects, add a cotton backing layer and batting between the jersey and backing. When sewing, use a ballpoint needle, stretch thread, and a slight zigzag stitch instead of a straight stitch. Some crafters use tissue paper or tear-away stabilizer on top while sewing to prevent puckering. Proper stabilization keeps your finished piece flat, durable, and professional-looking.
How long does it take to turn old jerseys into custom fabric goods?
DIY projects typically take 2-4 weeks depending on complexity. A simple pillow takes a weekend; a memory quilt takes 2-3 weeks. Professional custom textile services vary widely, some offer quick turnaround times of 1-2 weeks for simpler items, while detailed bespoke textiles may take 4-6 weeks. If you're commissioning work through a service like MoonlightWeave, ask about current turnaround times and deadlines. Rush options are often available but may affect pricing. Plan ahead if you're creating a gift with a specific date in mind.
Is DIY upcycling cheaper than buying custom fabric goods?
DIY upcycling costs less upfront if you already have the jerseys and basic sewing supplies. You'll spend $20-50 on interfacing, thread, and batting for a quilt. Professional custom textile services cost more due to labor, equipment, and expertise, but you get a finished, expertly-crafted piece without time investment. For valuable or sentimental jerseys, professional services protect your memorabilia better. Consider the cost-benefit: your time versus the quality guarantee and finished product. Many people choose professional services for irreplaceable items and DIY for projects where they want hands-on involvement.
This article was written using GrandRanker